Wednesday, October 9, 2013

Floral Crown


Floral Crown 

material :
Artificial flowers 
Floral Wire 
Floral tape
scissors
silicone


1.Measured the wire to your head and leave a space for wrapping the wire . Cut wire about two inches longer than this fitted loop .

2.Mold and gently cover al the wire with the floral tape around.

3.Roll the the stem of the flower around the wire or before adding the flowers to the base, you’ll create several small clusters of flowers. This avoids having to attach each flower individually and overloading the crown with tape. Pick a flower and continue adding 4-5 flowers, each one nestled right below the other. Tightly wrap the base with floral tape. Trim the tips if necessary.


4.Start adding them to the base. Position a cluster of flowers against the outside of the wire base and wrap tightly with floral tape. Overlap the second cluster over the first and wrap tightly with tape.


Have Fun!


Wednesday, August 28, 2013

Galaxy Shoes


Galaxy Shoes 

Buy a pair of cheap canvas shoesMake sure the shoes are a solid color. Converse, Vans, and Keds work great for this project, but you can use any shoes you'd like.

Material:


  • Masking tape
  • Your paints
  • Sponges (one for each color, ideally)
  • Paintbrushes
  • Paint tray
  • Water


  • Step 1Line the soles of your shoes with tape. This is to keep any paint from getting on them. You could risk it, but tape will give you a nice, symmetrical (clean!) line when you're finished.
    Step 2Take out the laces. You know how to do that part, right?


    Step 3-  Put your colors down. You can use 2 colors, and put white in the middle bc mix with white to get a brighter color. 
    Step 4- With sponges, start painting on the base colors. This is where a tutorial can't really guide you -- you'll have to decide where which colors go and how much color to put on. The important thing to do is to start with dark colors, end with light colors, and to blend them together. Experiment with combining colors, too, to produce gradients.


    Step 5A good way to create details is to paint as normal then blot with a paper towel to create a softer look. Continue adding details around the shoes, using whatever method you think looks best.
    Step 6Time for stars. Using a toothpick, toothbrush, or small paintbrush, flick little specks of white paint onto your shoes. To avoid creating a masterpiece all over your floor, hold your device just a few inches away from your shoes. If you mess up, just rub it in! Tada, cloud! But when it comes to the universe, there's very little "messing up."


    Step 7Spray the sealant all over the shoes. The instructions will tell you how far back you should stand.


    Have Fun !


    Sunday, August 18, 2013

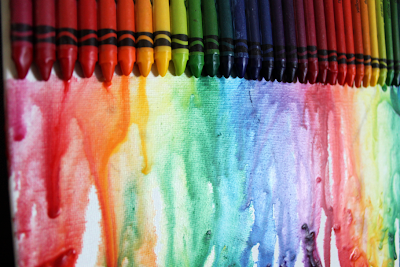
    Crayon Drip Art


    Crayon Drip Art


    Material :
    Crayons
    Canvas (You Choice the sizes)
    Hot Glue Gun
    Hair/blow dryer


    1. Sort the crayons out. Sort depending on what you want. A rainbow is a popular design, so if you choose it, place the crayons in the order of the rainbow. Some people order their crayons lightest to darkest, others use different shades of the same colour. The arrangement is totally up to you.


    2. Glue each crayon in order on the top of your canvas. 


    3.Use your blow dryer and blow the crayons. It's best to point the blow dryer downwards so that the wax will drip. 


    Have Fun !

    Saturday, August 17, 2013

    Pollock Impulse Dress


     Pollock Impulse Dress


    Materials :
    Textile Paint
    Brushes (Different sizes)
    Toothbrush (optional)
    Adhesive tape
    Tailor Chalk
    Measuring tape / ruler
    A big plastic bag


    String Heart


    String Heart Tutorial 


    Materials Needed:
    • piece of wood – the bigger the more dramtic!
    • string – we used the pink neon thin rope you can find at Home Depot, but you could use any yarn or string
    • box of nails (if want a nail with a decent head so the string won’t pop off)
    • spray paint to paint the wood
    • white paper to draw the heart on

    Step 1: Spray paint the wood the background color you picked. We used dark gray, so the pink would really pop
    Step 2: Once the paint is dry, tape the wood with the white paper and draw the heart shape on the paper. Step 3: Time to get the hammer out! Nail around the entire outline of the heart – we spaced our nails about an inch apart.


    Step 4: Once all your nails are in. Remove the white paper and throw it away.
    Step 5: Now the fun part. Get your string and tie a knot around the head of one of the nails. Keep stringing the string around nails. There isn’t a right or wrong way – just keep going until you like the pattern you created. I also then outlined the entire heart to make the outline pop a bit more also. 


    Have Fun 

    Painted Heart Bag


    Painted Heart Bag 


     Use a paper cut in the center with the shape of a heart , put it on top the white or the bag you have . With the gum of a pencil use some red color and start to make dots remember start at the end with dark red colors until it starts to discolor and have a light color on the top. 


     And now your bag is done , Have fun .

    Have Fun !

    Friday, August 16, 2013

    Fabric Sweet Votives


    Fabric Sweet Votives

    This is a tutorial for make some Sweet DIY Votives . 


    1. Measure the height and circumference of your jar, and cut strips of fabric to roughly fit (approx. 1cm wide – doesn’t have to be perfect).
    2. In your small cup, pour in some glue and dilute it with a bit of water (about 1:2), mix well. It should be the consistency of slightly thicker water.. yes, I know I’m being vague but it shouldn’t make much difference to the end result.
    3. Submerge your first strip of fabric in the glue. Once soaked, lightly run your thumb and forefinger down the strip to get rid of any excess glue.4. Place the strip into your jar (pattern side facing the jar) and position it. Use your paintbrush to push any air bubbles out from between the fabric and the jar.
    5. Repeat with the rest of your fabric. Allow to dry overnight before using.
    Note: - It would be best to use battery operated tea lights instead of real candles- I find that it’s ok to have fabric going above the top of your jar because it can be easily cut off after it’s dried.
    - I don’t mind the look of the overlapping lines of fabric once the candle is lit, but if you do try not to overlap the strips in the gluing process.


    Have Fun !

    Lace Shorts


    Lace Short Tutorial idea


    Supplies: Shorts & lace trim.
    Pantry Supplies: Sewing pins, needle & thread and/or sewing machine.

    Begin by pinning rows of lace onto the shorts, going all the way around so that it covers both the front and the back. Sew each layer in place. The shorts from the picture have zipper in the middle, so simply wrapped it underneath the flap and hand stitched it in place. Continue until you've reached the hem of the shorts, and sew the last layer in place.


    Have Fun !
    Hello an welcome to Cute Things and Crafts Blog I'll update clothing crafts, decorations, beauty tips, doll accessories & more . Follow us on :
    Twitter: @CraftsCute
    Instagram: CuteThings32